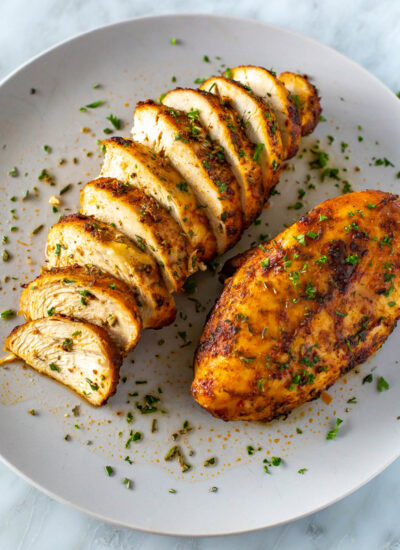
This is the perfect juicy baked chicken breast marinade recipe – it’s the only one you’ll ever need and it’s super customizable!

I’ve been making this oven baked chicken for 10 years now and it’s my go-to marinade. It’s great for meal prep, quick weeknight dinners, or adding protein to salads and grain bowls. Say goodbye to dry chicken because this foolproof recipe will give you juicy results every time!
Why you’ll love this recipe
- Super juicy: Your baked chicken breast will turn out super juicy and delicious thanks to my simple marinade that you can customize.
- Easy to make: Just marinate and bake in the oven for the easiest and tastiest chicken breast.
- Perfect for meal prep: This baked chicken breast stores and reheats well, making it great for lunches and dinners all week.

Ingredients and substitutions
- Chicken breasts – boneless skinless breasts are best for marinating.
- Olive oil – or another neutral cooking oil like avocado oil.
- Lemon juice – freshly squeezed is best but bottled lemon juice will work.
- Dijon mustard – try using regular mustard or honey mustard for a sweeter flavour.
- Paprika – cayenne will work but has more of a kick.
- Chili powder – use a blend of cumin, paprika and oregano instead.
- Onion powder – extra garlic powder would also work.
- Garlic powder – try using fresh minced garlic instead.
- Everything bagel seasoning – make your own or use a store-bought blend.

How to make marinated chicken breasts

Step 1: Make the marinade.
Mix the olive oil, lemon juice, dijon and spices together.
Step 2: Marinate the chicken.
Marinade for at least 15 mins and up to 48 hours.

Step 3: Add the chicken to a pan.
Add to a parchment-lined baking sheet.
Step 4: Bake in the oven.
Bake, then slice or chop into pieces.

Tips for the best chicken
Here are my top tips for making the best baked chicken breasts:
- Marinate: Don’t skip! Even if you’re short on time, 15 mins will do.
- Cooking methods: Bake in the oven for best results or try the grill or the air fryer if you prefer.
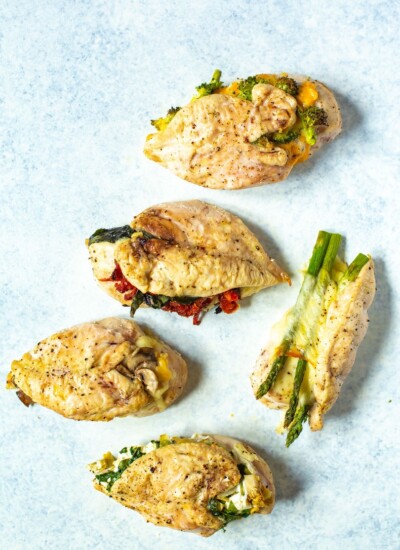
- Customize: Add or swap different spices until you find a combo you love.
- Don’t overcook: Use a meat thermometer! The chicken should reach an internal temp of at least 165 F.
- Let it rest: Give it at least 5 mins before digging in.
Frequently asked questions
What type of chicken should I use?
This recipe works best with boneless skinless chicken breasts. If you want to use chicken thighs, try my boneless skinless chicken thigh or my fave perfect baked chicken thigh recipes.
Should I marinate or brine chicken breasts before baking?
Marinating or brining chicken breasts can both bring out more of their flavor and juiciness. I like marinating even if I’m short on time, because as little as 15 minutes can work. Take a look at Gimme Some Oven‘s suggestions on brining to learn more!
Should I cover chicken breasts with foil while baking?
It’s generally recommended to bake chicken breasts uncovered. But if the chicken starts to brown too much before reaching the proper internal temperature, you can loosely cover it with foil to prevent over-browning.

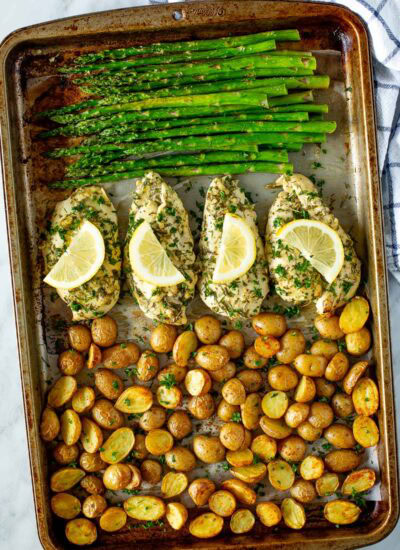
What to serve on the side
Here are some ideas for what to serve with your marinated chicken:
- Simple green salad with homemade dressing or this yummy arugula salad.
- Roasted potatoes, sweet potato fries or baked potatoes would all be yummy.
- Keep it healthy with brussels sprouts or steamed veggies.
- Try a variety of rice or cauliflower rice recipes as a side.
How to store and reheat
- Store: Place cooked chicken in an airtight container and refrigerate for up to 5 days.
- Reheat: Sprinkle a bit of water over the chicken to retain its moisture, then microwave for 1-2 minutes until warmed through.
- Freeze & Reheat: Freeze cooked chicken in freezer-safe containers for up to 3 months. Thaw in the refrigerator overnight, then reheat as you would normally.

More chicken breast recipes


The Best Marinated Chicken Breast Recipe
Ingredients
- 1 lb chicken breasts about 6 oz each
- 1/4 cup olive oil
- 2 tbsp lemon juice
- 1 tbsp Dijon mustard
- 1/2 tsp paprika
- 1/2 tsp chili powder
- 1/2 tsp onion powder
- 1/2 tsp garlic powder
- 1/2 tsp each salt & pepper
- 1/2 tsp everything bagel seasoning optional but takes it over the top
Instructions
- Preheat oven to 425 F. Mix olive oil, lemon juice, dijon and spices together in a small bowl, and pour over chicken in a resealable bag. Marinate for at least 15 minutes and up to 48 hours.
- Line a baking sheet with parchment paper, then add marinated chicken breasts. Bake for 20 minutes. Check that chicken is cooked through by using a meat thermometer. Make sure it registers at least 165 F degrees in the thickest part of the chicken. Oven temperatures will vary so cooking times may vary slightly.
- Let chicken rest for 5 minutes before slicing or chopping.
For larger breasts
- For 8 oz breasts: bake 22-25 minutes. For 10oz breasts: bake 28-30 minutes. Check that chicken is cooked through by using a meat thermometer every time. Make sure it registers at least 16% F degrees in the thickest part of the chicken.


Comments & Reviews
Janet says
Easy and Delicious. A keeper. Thanks
Taylor Stinson says
I’m so happy you love it!
Shelley says
Delicious! I’ve used these same in marinades before, but something about this recipe really stands out. It had just a tiny bit of “heat” on it but was not at all spicy. Just incredibly flavorful and SO SIMPLE to put together!
Taylor Stinson says
I’m so happy you love it and thank you for leaving your review 🙂
Amber Herrick says
Do you pound to even thickness first? Do they cook evenly without pounding?
Katie Didow says
I think this all depends on the breasts you’re working with. Sometimes, they’re around the same size so I feel like I can get away without pounding them ot even thickness. If there’s any noticeable visible discrepancy, I would recommend pounding them so they’re the same size.
Yarfin yunita anabokoy says
So delicious
Nirmala Dube Kuhl says
Hi, I’m really excited to try this today since I can never make chicken breast taste good without adding tons of calories. My plan was to make it for a daily salad. If I put it in the fridge, how do you reheat it where it doesn’t dry out and still taste good?
Taylor Stinson says
You can sprinkle some water over top then microwave for 1-2 mins 🙂
Natalie says
Do I cover the chicken while it’s baking? Thanks!
Taylor Stinson says
No you don’t need to 🙂
Erin C M Grant says
Great ideas, thank you! I’ve tried a few and they are great!
Just wanted to point out a missing word from this sentence: “Just make sure to let your baked chicken breast before serving, as this makes the biggest difference in juiciness.”… you may be missing the word “rest”?
Thanks so much for all the recipes and inspiration!
Taylor Stinson says
Whoops, yes looks like a typo. Thanks for your help in pointing it out!
Laura says
What do we do with the 1 tbsp of olive oil?
Taylor Stinson says
You use it with the spice rubs! If using the marinades, disregard.
Marjorie says
Hi! Great food blog! I hate most food blogs because I don’t care a lot about how you made this dish when you first met you husband and he had the two dogs then which is how blah, blah, blah. I also love that the pictures are helpful and not just an example of how beautiful you can sprinkle flour around your tools. I like how the words and pictures are helpful in preparing the food. Bookmarked! Thank you!
Aaron says
I agree with Marjorie, it’s refreshing to have a recipe without a superfluous back story and useless fluff pictures that are purely eye-candy, but not helpful in any way. I just discovered this blog, but I have a feeling this will be among my favs!
Moe says
Hi, love these recipes! Do they freeze well?
Taylor Stinson says
Hey Maureen! They do – you can freeze in glass bowls up to 3 months. Defrost in the fridge overnight then reheat in the microwave for 1-2 minutes with some water sprinkled overtop 🙂
Brittany Peterson says
For some reason I can only see 1 recipe. I used to be able to see all of the baked chicken marinade and rubs. Do you know what happened?
Taylor Stinson says
Hi Brittany, I think you might be looking for this post: https://thegirlonbloor.com/20-easy-best-chicken-marinade-recipes/